Now add type, color, or do what ever you'd like to with your image. When you're finished, open the File menu and click "Save As". Use the dialog box to choose where you want to save your file, then give it a name followed by ".ico" (without quotes), and click "Save". (The extension ".ico" tells Windows that it's an icon file). Now you can change any shortcut or folder to your own icon and just browse to it on your hard drive.
Thursday, May 31, 2007
Make Your Own Personalized Icons in Windows XP
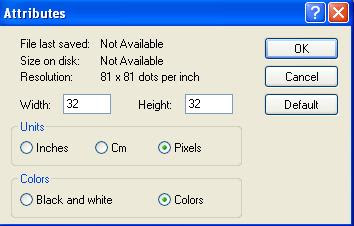
It's extremely easy to create your own icons in Windows XP. Here you go: Open paint and on the Image menu, click Attributes. Type 32 for both the width and height of the document, and make sure that Pixels is selected under Units. Click [OK] to create a new 32x32 - pixel document : the size of an icon.
Now add type, color, or do what ever you'd like to with your image. When you're finished, open the File menu and click "Save As". Use the dialog box to choose where you want to save your file, then give it a name followed by ".ico" (without quotes), and click "Save". (The extension ".ico" tells Windows that it's an icon file). Now you can change any shortcut or folder to your own icon and just browse to it on your hard drive.
Now add type, color, or do what ever you'd like to with your image. When you're finished, open the File menu and click "Save As". Use the dialog box to choose where you want to save your file, then give it a name followed by ".ico" (without quotes), and click "Save". (The extension ".ico" tells Windows that it's an icon file). Now you can change any shortcut or folder to your own icon and just browse to it on your hard drive.
Subscribe to:
Post Comments (Atom)


2 comments:
Great instructions on how to create your own icons - even a 'caveman' can do it. Thanks.
I honestly didn't know that you could force paint to save as an ico. I always used Icon XP for the free 30 day trial and saved as many icons as I could. Thank you so much for the help!
Post a Comment