When you go to a web site, the first thing that happens is that a query goes out to the DNS server for IP address of the web site.In order to eliminate this query, you can simply add the IP address and web name into the HOSTS file in the Windows directory.To find the IP address, just PING the web name (ping www.microsoft.com)
For example, Microsoft would be:
192.168.1.5 www.microsoft.com #.url
You can do this for all the sites you regularly visit.
Showing posts with label Networking tips. Show all posts
Showing posts with label Networking tips. Show all posts
Sunday, May 06, 2007


Saturday, May 05, 2007
Allowing Network Access with Blank Passwords (XP and Vista)
Although you can log in locally without a password, by default, WindowsXP Pro does not allow network users to access the computer without a password. Typically you will receive an Unknown error 31 if this is the case.
To change this setting:
1. Run gpedit.msc
2. Go to Computer Configuration / Windows Settings / Security Settings / Local Policies / Security Options

3. Double click on Accounts: Limit local account use of blank passwords to console login only
4. Disable this option
To change this setting:
1. Run gpedit.msc
2. Go to Computer Configuration / Windows Settings / Security Settings / Local Policies / Security Options

3. Double click on Accounts: Limit local account use of blank passwords to console login only
4. Disable this option
Wednesday, May 02, 2007
Network Adapters
A network computer is connected to the network cabling with a network interface card, (also called a "NIC", "nick", or network adapter. Some NICs are installed inside of a computer: the PC is opened up and a network card is plugged directly into one of the computer's internal expansion slots. 286, 386, and many 486 computers have 16-bit slots, so a 16-bit NIC is needed. Faster computers, like high-speed 486s and Pentiums, often have 32-bit, or PCI slots.
These PCs require 32-bit NICs to achieve the fastest networking speeds possible for speed-critical applications like desktop video, multimedia, publishing, and databases. And if a computer is going to be used with a Fast Ethernet network, it will need a network adapter that supports 100Mbps data speeds as well.
These PCs require 32-bit NICs to achieve the fastest networking speeds possible for speed-critical applications like desktop video, multimedia, publishing, and databases. And if a computer is going to be used with a Fast Ethernet network, it will need a network adapter that supports 100Mbps data speeds as well.
Networking : Cabling Basics
The two most popular types of network cabling are twisted-pair (also known as 10BaseT) and thin coax (also known as 10Base2). 10BaseT cabling looks like ordinary telephone wire, except that it has 8 wires inside instead of 4. Thin coax looks like the copper coaxial cabling that's often used to connect a VCR to a TV set.
Which type of cabling is best for you? Thin coax and 10BaseT can both be used exclusively or together, depending on the type of network that you're putting together.
Small networks, for example, may want to use 10BaseT cabling by itself, because it's inexpensive, flexible, and ideal for going short distances. Larger networks (usually with 10 or more computers) may use a thin coax backbone with small clusters of 10BaseT cabling that branch off from it at regular intervals.
Which type of cabling is best for you? Thin coax and 10BaseT can both be used exclusively or together, depending on the type of network that you're putting together.
Small networks, for example, may want to use 10BaseT cabling by itself, because it's inexpensive, flexible, and ideal for going short distances. Larger networks (usually with 10 or more computers) may use a thin coax backbone with small clusters of 10BaseT cabling that branch off from it at regular intervals.
Network Printing
In client-server networks, network printing is normally handled by a print server, a small box with at least two connectors: one for a printer, and another that attaches directly to the network cabling. Some print servers have more than two ports--they may, for example, support 2, 3, or 4 printers simultaneously.
When a user sends a print job, it travels over the network cabling to the file server where it is stored. When the print server senses that the job is waiting, it moves it from the file server to its attached printer. When the job is finished, the print server returns a result message to the file server, indicating that the process is complete.
Print Servers are available for both client-server and peer-to-peer networks. They're incredibly convenient because they let you put a printer anywhere along your network even if there isn't a computer nearby.
However, users often opt not to use a print-server with their peer-to-peer network. Why? Because every computer's resources are available to everyone on the network, Sally can print a job on John's printer--just as if Sally had a printer attached to her computer.
Remote access allows users to dial into their home networks from anywhere in the world. Once a connection has been established over ordinary phone lines by modem, users can access any programs or data on the network just as if they were seated at one of its local workstations. Some remote access servers only provide access to a file server's disk drives.
Others can provide access to both the file server and direct access to any PC's hard disk on the network. This saves time because it allows a remote user to communicate directly with any network user without having to go through the file server.
Modem sharing lets local network users dial out from their individual network computers to access the Internet, bulletin boards, America On-Line, and more. After firing up their favorite communications software, local users establish a link with the remote-node server over the network, which opens up an outgoing telephone line.
Users' individual PCs don't need modems, which is a big money saver--only a single modem & phone line are required for tens or hundreds of users. In the case of peer-to-peer networks, by contrast, every PC requires its own modem for access to the outside world.
When a user sends a print job, it travels over the network cabling to the file server where it is stored. When the print server senses that the job is waiting, it moves it from the file server to its attached printer. When the job is finished, the print server returns a result message to the file server, indicating that the process is complete.
Print Servers are available for both client-server and peer-to-peer networks. They're incredibly convenient because they let you put a printer anywhere along your network even if there isn't a computer nearby.
However, users often opt not to use a print-server with their peer-to-peer network. Why? Because every computer's resources are available to everyone on the network, Sally can print a job on John's printer--just as if Sally had a printer attached to her computer.
Remote access allows users to dial into their home networks from anywhere in the world. Once a connection has been established over ordinary phone lines by modem, users can access any programs or data on the network just as if they were seated at one of its local workstations. Some remote access servers only provide access to a file server's disk drives.
Others can provide access to both the file server and direct access to any PC's hard disk on the network. This saves time because it allows a remote user to communicate directly with any network user without having to go through the file server.
Modem sharing lets local network users dial out from their individual network computers to access the Internet, bulletin boards, America On-Line, and more. After firing up their favorite communications software, local users establish a link with the remote-node server over the network, which opens up an outgoing telephone line.
Users' individual PCs don't need modems, which is a big money saver--only a single modem & phone line are required for tens or hundreds of users. In the case of peer-to-peer networks, by contrast, every PC requires its own modem for access to the outside world.
Tuesday, April 24, 2007
WindowsXP Remote Desktop
The following page details the steps necessary to create a WindowsXP Remote Desktop Connection
Remote Desktop allows you to take control of another computer on your local network or across the Internet
Configuring the XP Remote Client
01. Go to Start / Programs / Accessories / Communications / Remote Desktop Communication
Or
Start / Run / mstsc.exe
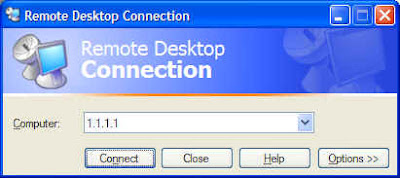
02. Enter in the IP address of the computer you want to connect to
03. If it is a computer on your LAN, just enter the computer's LAN IP address
04. If it is a computer you want to access over the Internet, you need to enter in the Public IP address of the HOST's Internet connection. You would also need to configure any router to forward the default port 3389 to the computer's LAN IP address.
05. If this is a computer with a different port than the default you want to connect to, in addition to entering the IP address, you would also need to include the Port number.
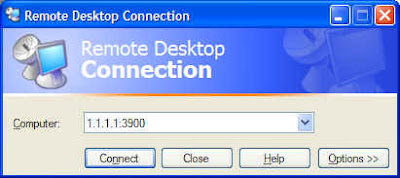
06. Click on the Connect button
07. At the login screen, enter the name and password of a user that has remote access on the host
08. If you want to click on the Options button, you can configure it for things like automatic logon, size and amount of colors (less improves performance).
You can also save shortcuts to your Desktop for future use
Remote Desktop allows you to take control of another computer on your local network or across the Internet
Configuring the XP Remote Client
01. Go to Start / Programs / Accessories / Communications / Remote Desktop Communication
Or
Start / Run / mstsc.exe

02. Enter in the IP address of the computer you want to connect to
03. If it is a computer on your LAN, just enter the computer's LAN IP address
04. If it is a computer you want to access over the Internet, you need to enter in the Public IP address of the HOST's Internet connection. You would also need to configure any router to forward the default port 3389 to the computer's LAN IP address.
05. If this is a computer with a different port than the default you want to connect to, in addition to entering the IP address, you would also need to include the Port number.

06. Click on the Connect button
07. At the login screen, enter the name and password of a user that has remote access on the host
08. If you want to click on the Options button, you can configure it for things like automatic logon, size and amount of colors (less improves performance).
You can also save shortcuts to your Desktop for future use
Windows XP Network Diagnostic Tool
Network Diagnostics gathers information about your computer to help you troubleshoot network and e-mail related problems with your computer. Network Diagnostics enables you to run a variety of tests to gather different types of information about your network and your computer. You can scan for such things as network connectivity, email configuration, web browser settings and other items.
To get to the Network Diagnostics Tool click on Start and then Help and Support. From there click on the link that says Use Tools to view your computer information and diagnose problems. Then on the left hand column click on Network Diagnostics.
You can choose which items you want scanned by clicking on the Set scanning options link.

To begin the scan, click on Scan your system. As you can see from the results of this scan it breaks down the results into 3 categories, Internet service, computer information and modems and network adapters. If an item has a plus next to it that means you can click on it to get more information about that item.

If you want to save the output of the scan you can click on the Save to file button to have it saved to an HTML file that you can review later. This will come in handy if you need to send the results to someone else to review to help diagnose a network problem.
Friday, April 20, 2007
WindowsXP Remote Assistance
Remote Assistance allows another user either on a local network or over the Internet, to connect to your computer and assume control of its functioning.The basics are detailed below.
Enabling Remote Assistance
01. Before you can request that someone control your computer, you need to enable Remote Assistance.
02. Right click on the My Computer icon
03. Select Properties
04. Click on the Remote tab
05. Check Allow Remote Assistance invitations to be sent from this computer
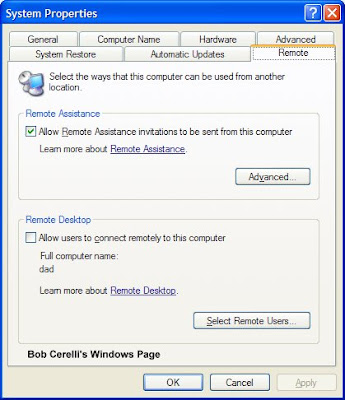
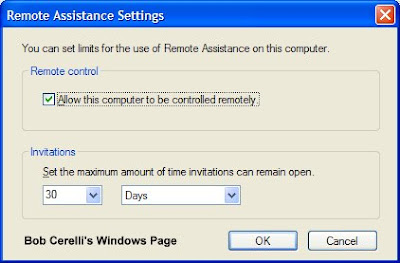
06. Click on the Advanced tab
07. Check Allow this computer to be controlled remotely
Enabling Remote Assistance
01. Before you can request that someone control your computer, you need to enable Remote Assistance.
02. Right click on the My Computer icon
03. Select Properties
04. Click on the Remote tab
05. Check Allow Remote Assistance invitations to be sent from this computer

06. Click on the Advanced tab
07. Check Allow this computer to be controlled remotely

Monday, April 16, 2007
Network Access After Norton Anti-Virus Install
Sometimes you can't access a WinXP computer after installing Norton Anti-Virus.
There might be a variety of errors at the other computer depending on the operating system.
On the XP computer, in the Event Viewer / System log, there will be the following error:
The server's configuration parameter "irpstacksize" is too small for the server to use a local device.
Start Regedit
Go to HKEY_LOCAL_MACHINE\SYSTEM\CurrentControlSet\Servic es\lanmanserver\parameters
Edit the IRPStackSize
Give it a value of 15
Reboot the computer
There might be a variety of errors at the other computer depending on the operating system.
On the XP computer, in the Event Viewer / System log, there will be the following error:
The server's configuration parameter "irpstacksize" is too small for the server to use a local device.
Start Regedit
Go to HKEY_LOCAL_MACHINE\SYSTEM\CurrentControlSet\Servic es\lanmanserver\parameters
Edit the IRPStackSize
Give it a value of 15
Reboot the computer
Friday, April 13, 2007
Sharing an internet connection using a Router
WEB OF DECEIT
One dark and stormy evening, you decide to share your Internet connection with the rest of your household. So you bring home a wireless router, an innocent-looking little gadget with a pair of black antennas sticking out of the back that give it the look of a squat, electronic bunny. When you connect it to your broadband modem and power it on, blinking lights on the front of the unit begin to contort themselves into an evil grimace. Suddenly overcome with fear, you check your computers to see if your wireless connection is working. You're somewhat relieved to see an icon in the lower-right side of the screen telling you that your wireless connection is working.
With great trepidation, you open a browser to surf the Internet, and that's when terror strikes. Your home page cannot be found. You try Google, Yahoo, and CNET, and to your dismay, they are gone, all gone. The World Wide Web has vanished, and each time you try to access a different site, your router's evil blinking grimace shines on.
These tips can help you use your wireless router to share your Internet connection
1. Configure your router for PPPoE.
You can configure most routers to handle PPPoE authentication.In many cases, a wireless router will let you share your Internet connection without much fiddling on your part. However, some Internet service providers use technologies that make Internet sharing more difficult. Many DSL providers use PPPoE, or point-to-point protocol over Ethernet, as a means of permitting their customers to log on to their broadband service. In order to establish your Internet connection, you must first submit a username and password via PPPoE, a process called authentication. Often, this authentication is handled by software that you or your service provider installed on one of your computers when you purchased the service. You can't install the same software on your router, but you can configure your router to supply the right PPPoE information for your service. You should have this information in the documentation you received when you purchased the service, but you can also call your provider to get it. Simply enter the information in the PPPoE section of your router's browser-based configuration tool and reboot your router; now the router will handle your PPPoE authentication and provide broadband Internet access to all of the devices connecting through it
2. Give your router your DNS information. If you're still unable to call up Web pages, make sure that you've entered the correct IP addresses for your service provider's domain name servers along with your PPPoE login information. Domain name servers take easy-to-remember URLs, such as www.cnet.com, and map them to their routable IP addresses. Ultimately, it's the IP address that lets you locate the computer with the Web page you're looking for on the Internet. Without a domain name server, or DNS, URLs are useless. Most service providers give you two DNS addresses: a primary address and a secondary one. The secondary server is a backup should the primary DNS server fail. If your router lacks correct addresses for your service's DNS servers, it may be able to connect you to the Internet, but it won't be able to help you use URLs to call up Web pages. Here, too, your service provider should have sent you the IP addresses of your primary and secondary DNS servers when you purchased broadband service. If it didn't or if you misplaced the information, call your service provider and ask for the IP addresses of your DNS servers
One dark and stormy evening, you decide to share your Internet connection with the rest of your household. So you bring home a wireless router, an innocent-looking little gadget with a pair of black antennas sticking out of the back that give it the look of a squat, electronic bunny. When you connect it to your broadband modem and power it on, blinking lights on the front of the unit begin to contort themselves into an evil grimace. Suddenly overcome with fear, you check your computers to see if your wireless connection is working. You're somewhat relieved to see an icon in the lower-right side of the screen telling you that your wireless connection is working.
With great trepidation, you open a browser to surf the Internet, and that's when terror strikes. Your home page cannot be found. You try Google, Yahoo, and CNET, and to your dismay, they are gone, all gone. The World Wide Web has vanished, and each time you try to access a different site, your router's evil blinking grimace shines on.
These tips can help you use your wireless router to share your Internet connection
1. Configure your router for PPPoE.
You can configure most routers to handle PPPoE authentication.In many cases, a wireless router will let you share your Internet connection without much fiddling on your part. However, some Internet service providers use technologies that make Internet sharing more difficult. Many DSL providers use PPPoE, or point-to-point protocol over Ethernet, as a means of permitting their customers to log on to their broadband service. In order to establish your Internet connection, you must first submit a username and password via PPPoE, a process called authentication. Often, this authentication is handled by software that you or your service provider installed on one of your computers when you purchased the service. You can't install the same software on your router, but you can configure your router to supply the right PPPoE information for your service. You should have this information in the documentation you received when you purchased the service, but you can also call your provider to get it. Simply enter the information in the PPPoE section of your router's browser-based configuration tool and reboot your router; now the router will handle your PPPoE authentication and provide broadband Internet access to all of the devices connecting through it
2. Give your router your DNS information. If you're still unable to call up Web pages, make sure that you've entered the correct IP addresses for your service provider's domain name servers along with your PPPoE login information. Domain name servers take easy-to-remember URLs, such as www.cnet.com, and map them to their routable IP addresses. Ultimately, it's the IP address that lets you locate the computer with the Web page you're looking for on the Internet. Without a domain name server, or DNS, URLs are useless. Most service providers give you two DNS addresses: a primary address and a secondary one. The secondary server is a backup should the primary DNS server fail. If your router lacks correct addresses for your service's DNS servers, it may be able to connect you to the Internet, but it won't be able to help you use URLs to call up Web pages. Here, too, your service provider should have sent you the IP addresses of your primary and secondary DNS servers when you purchased broadband service. If it didn't or if you misplaced the information, call your service provider and ask for the IP addresses of your DNS servers
Sunday, April 01, 2007
Winproxy 6.1 R1B Final Cracked

WinProxy Ultimate Internet Security Suite Provides a Complete Internet Security Solution with Anti-Spyware, Anti-Phishing, Antivirus, Antispam, Firewall, and Web Filtering in one easy to use software suite. Connect the entire office or home to the Internet while keeping your network safe.WinProxy saves you money by eliminating the need for multiple security products, multiple phone lines, modems, a dedicated server and user accounts. Save yourself the trouble of spyware and viruses entering your network. Spare yourself the embarrassment of sending viruses to others with WinProxy Antivirus scanning incoming and outgoing email messages at the gateway. Block spam and inappropriate web sites with WinProxy Antispam from Sophos and WinProxy URL Filtering from Blue Coat. Don't let spam and inappropriate web surfing sap your network bandwith and employee productivity... try WinProxy for free and see for yourself.If you like WinProxy, you pay a low registration fee to keep Anti-Spyware, Antivirus, Antispam, and Web Filtering subscriptions active. You will not want to take WinProxy out of your network once you get used to it protecting your shared network from viruses while helping your employees to be more efficient with web filtering while also keeping hackers out of your sensitive computer files.
Download :
Winproxy 6.1
Thursday, March 29, 2007
Communication between routers
The Internet is a network of networks. The Internet consists of large number of autonomous systems, each of which further consists of routing domains. Such autonomous systems are usually run by the larger companies or universities. Within the Autonomous system, a router communicates with the other router using the best intra domain routing protocols, which are known as interior gateway protocols. Autonomous system are connected via gateways, these exchange information using inter domain routing protocol, which are also called exterior gateway protocols.
The RIP or (Routing Information Protocol) is the commonest interior gateway protocol and the recent protocol such as open shortest path first (OSPF). The purpose of these protocols is to enable routers to exchange locally so that all the routers in the autonomous system must a have coherent and up to date information.
When a host receives the new routing information, it is likely to update not only to it but also sends this new updated information to all the connected hosts so that they can updated themselves. Hence these changes propagate across the entire network.
Routing in the Internet
Routing is the method in which data finds its destination from one computer to the next. In the Internet there are 3 major aspects of routing.
1. Physical Address Finding
2. Determination of inter-network gateways
3. Numeric and symbolic Addresses
Physical address finding is the method of the Internet Routing and is used when datagram is transmitted from a computer. It is necessary to encapsulate the IP datagram. This encapsulation requires the local network or physical address.
If a computer wishes to transmit IP datagram it needs to encapsulate the physical address of the destination network device in the frame. This address can be achieved by using the table that will map the IP address with the physical address. Such table can be configured into a file that can be read into the memory at the boot up time. Computer normally uses the Address Resolution Protocol (ARP), which operates dynamically to maintain the translation table.
The second method is necessary because the Internet consists of a large number of local networks, which are interconnected with each other by gateways. Such gateways are known as routers, which has physical as well as logical connectivity with many networks.
The determination of the best suitable gateway and port for a particular IP address is called routing.
The third method generally involves the translation of the human friendly form (names) to the number address (IP Address). IP address can’t be remembered due to its numeric form but the simplest names (domain names) are easy to remember e.g www.yahoo.com, www.google.com, www.msn.com are easiest to remember as compared to the IP addresses 122.11.22.34, 223.45.66.76, 155.44.55.120. DNS translates the domain names into the IP address and IP address into the domain name. This domain to IP translation is a must for communicating on the Internet because communication on the Internet is performed by the IP addresses.
Monday, March 26, 2007
Accessing an FTP Site Through Internet Explorer
FTP (File Transfer Protocol) is the language used to transfer files from computer to computer over the internet or over a network.
To access files from a remote site you need to know a few things. First of all you will need to know the FTP site address or IP Address. If the site requires a login name and password you will have to obtain these as well. Some sites allow for anonymous login where you do not need a name and password.
The next step is to open Internet Explorer (or any other web browser) and type in the site address in the address bar. You will need to type ftp:// and then the address or IP address. For example you can type it as ftp://ftp.microsoft.com or ftp://192.168.1.25 depending on what information you have.
If the FTP site requires you to login you can right click anywhere and select Login As and type in your information.

After you have successfully logged on you will see the available folders that you have permission to access. It will look very similar to your Windows Explorer or My Computer view. From here you can copy and paste files and folders from your local hard drive to the FTP site and vice versa. Keep in mind that you will need to have the appropriate permissions to add, change or remove files from the FTP site. These permissions will be assigned to your user account by the administrator of the FTP sites.
Windows XPs Stored User Names and Passwords Tool
With Windows XP you can store your user credentials in your Windows XP system by saving them to your user profile. When you connect to a network or internet resource you may see a box that says Remember My Password. If you use the Stored User Names and Passwords tool it will use that information to log into that resource the next time you log in with your stored user credentials from your user profile. When you access a resource, the authentication package searches the Stored User Names and Passwords store for the most specific credential that matches that resource. If it finds one, it will be used to authenticate you without any interaction from you.
Here is how you manage your Stored User Names and Passwords.
1. Log on to the computer as the user whose account you want to change.
2. Click on Start, then click Control Panel. Or Start, Settings Control Panel.
3. Click on User Accounts.
4. Open the Stored User Names and Passwords dialog box
1. Log on to the computer as the user whose account you want to change.
2. Click on Start, then click Control Panel. Or Start, Settings Control Panel.
3. Click on User Accounts.
4. Open the Stored User Names and Passwords dialog box
| If you log on with a limited account click Manage my network passwords under Related Tasks. If you log on with an administrator account, click your user account under or pick an account to change, and then open the What do you want to change about your account? dialog box. Under Related Tasks, click the Manage my network passwords. |
From here you can add, remove or edit your stored passwords. If you click on Add you will get a dialog box like the following.

Here you can enter the name of the server or site you want to store your password with, your username that you logon with and the password for that username. Next time you login to that server you won’t have to enter any credentials.
Thursday, March 22, 2007
Mapping a Network Drive
As you may have noticed when you went to your My Computer icon or Windows Explorer that you have drive letters assigned to your drives. Your floppy disk drive is assigned A, your hard drive is assigned C and your CDROM is assigned the letter D. If you have more than one hard drive or CDROM then these letters may vary.
If you have a home network or are on a network at the office you may have network drives or locations that you access frequently or copy data to and from on a regular basis. To make this process easier you can map a network drive to your network location. What this does it assign a drive letter to your networked drive. You can use any available letter from A to Z as long as it is not already in use. Then this drive letter will show up in Windows Explorer along with your other drives and stay there unless the connection to that drive is lost. Then you will see a red x through your drive letter.
We will go over the 2 easiest ways to map a network drive. One way is to open My Computer or Windows Explorer and go to Tools and then Map Network Drive. You should see a dialog box like this.

As you can see here it is asking you to pick the drive letter you want to assign to this new drive and the location of the networked/shared folder. You can either type it in if you know the UNC path or browse to it. If you check the Reconnect at login box then every time you login to your computer it will map that drive again for you.
Another way to map a network drive is to find the shared folder by browsing My Network Places. Then you would right click the folder you want to map and select Map Network Drive. You will get the same window as above except the Folder box will be filled in automatically with the path of the folder you right clicked on.
Configuring the Windows Firewall in Windows XP SP2
Windows XP Service Pack 2 comes with a built in firewall feature that helps make your system less vulnerable to attack by outside users or by malicious software, such as viruses. It is installed automatically when you install Service Pack 2. There are ways to adjust the settings of the firewall to work around potential things that you may not want blocked from your computer. You an also turn it off but it is not recommended unless you have some other firewall solution.
A firewall is PC software or hardware that restricts information that comes to your computer from other computers on the internet and allows you to control the data coming in and out of your computer. It checks information or traffic coming from the internet or your network and then either allows or disallows it, depending on your firewall settings. A firewall also provides protection against people or programs, including viruses and worms that try to connect to your computer with the intent to cause harm.
To open the Windows Firewall you can go to start, settings and then Control Panel and double click the Windows Firewall icon. Or you can go to Start and then run and type wscui.cpl to open the Windows Security Center and then access the firewall from there.

As you can see here you have the options to turn the firewall on or off as well as allow or disallow exceptions. Exceptions are rules that allow certain types of user defined traffic into your computer.

You can see in this example that certain programs are allowed to pass traffic to and from the computer. You can also add programs not on the list or open ports that may be needed by certain applications.
You may have seen a message from the firewall asking you if you want to block or unblock a connection. If you choose to unblock the connection, Windows Firewall creates an exception so that the firewall won't prompt you when that program needs to receive information in the future.
The Advanced tab allows for further configuration of the firewall.

It will allow you to change settings such as which network connection the firewall will be used on. Most users will only have their one main internet or network connection. You can also enable logging from this area. There are the following options for logging:
To enable logging of unsuccessful inbound connection attempts, select the Log dropped packets check box.
To enable logging of successful outbound connections, select the Log successful connections check box.
Under Log File Options you can change the name and location of the firewall log.
Security logging is not enabled by default.
You can also choose to have the computers on your network share error and status information using ICMP.
Keep in mind that the Windows Firewall does not detect or disable computer viruses and worms if they are already on your computer, stop you from opening e-mail with dangerous attachments or block spam or unsolicited e-mail. So you still need to be careful and implement virus protection software and watch for those strange e-mails.
Wednesday, March 07, 2007
Easy way to Re-Dial on busy signals
If the line is busy to your provider and you don't want to *wait* until your dialer will re-dial,just press ESC key and then press enter key or click on connect - meaning it will dial-up again immediately.
Monday, February 26, 2007
Accessing an FTP Site Through Internet Explorer

FTP (File Transfer Protocol) is the language used to transfer files from computer to computer over the internet or over a network.
To access files from a remote site you need to know a few things. First of all you will need to know the FTP site address or IP Address. If the site requires a login name and password you will have to obtain these as well. Some sites allow for anonymous login where you do not need a name and password.
The next step is to open Internet Explorer (or any other web browser) and type in the site address in the address bar. You will need to type ftp:// and then the address or IP address. For example you can type it as ftp://ftp.microsoft.com or ftp://192.168.1.25 depending on what information you have.
If the FTP site requires you to login you can right click anywhere and select Login As and type in your information.
After you have successfully logged on you will see the available folders that you have permission to access. It will look very similar to your Windows Explorer or My Computer view. From here you can copy and paste files and folders from your local hard drive to the FTP site and vice versa. Keep in mind that you will need to have the appropriate permissions to add, change or remove files from the FTP site. These permissions will be assigned to your user account by the administrator of the FTP site.
Wednesday, February 21, 2007
Network Connection Always Shows Access Denied
If you are always getting Access Denied errors when trying to connect to a XP computer, and you know you have the correct user names and passwords on the computer, the solution may be a simple registry edit.
01.Start Regedit
02. Go to HKEY_LOCAL_MACHINE / SYSTEM / CurrentControlSet / Control / Lsa
03. Change the value of a key called "restrictanonymous" to 0 instead of 1
04. Don't change "restrictanonymoussam" value.
05. Reboot
01.Start Regedit
02. Go to HKEY_LOCAL_MACHINE / SYSTEM / CurrentControlSet / Control / Lsa
03. Change the value of a key called "restrictanonymous" to 0 instead of 1
04. Don't change "restrictanonymoussam" value.
05. Reboot
Subscribe to:
Posts (Atom)


